A2 Pop-Up Owl Card
Creating a handmade greeting card that actually stops people in their tracks is a challenge. Most crafters settle for flat, printed designs because complex mechanisms seem too difficult or prone to failure. However, the A2 Pop-Up Owl Card offers a middle ground: it delivers the wow factor of a three-dimensional pop-up without requiring advanced engineering skills or expensive machinery. When you choose this specific design, you are opting for a project that balances visual impact with manageable construction steps.
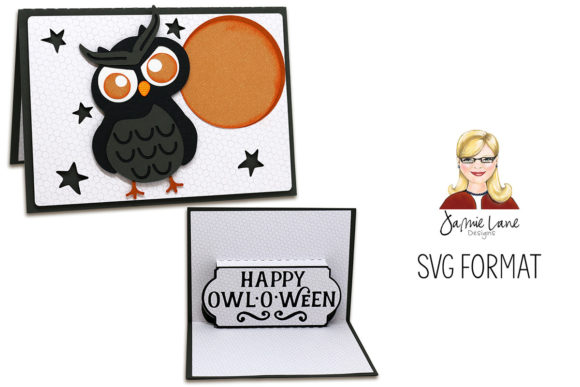
This card measures approximately 4-1/4 x 5-1/2 inches when finished, which is the standard A2 size. This dimension is crucial because it fits perfectly into most standard envelopes and retail display racks, making it highly practical for both personal gifting and small business sales. The interior features a clever pop-up mechanism centered around an owl motif. Unlike simple fold-out cards, this design uses layered mats to create depth, giving the owl a distinct presence on the page.
Understanding What You Are Downloading
Before you cut a single piece of paper, it is vital to understand exactly what comes in the digital file package. Many beginners assume they are receiving a single PDF ready to print and assemble. In reality, high-quality digital templates usually provide a modular system. For this specific A2 Pop-Up Owl Card, the files typically include the card base, the individual paper elements for the owl, the inside pop-up mat, and separate mats for the pop-up layers.
This modularity is a feature, not a bug. It allows you to customize colors and patterns easily. However, it also introduces a potential pitfall: scale compatibility. The files are designed to be compatible with both 8x12 inch and 12x12 inch cutting mats. If you are using a die-cutting machine or a electronic cutter like a Cricut or Silhouette, you must ensure your software settings match the mat size you are using. Loading a template meant for an 8x12 mat onto a 12x12 canvas without adjusting the scale will result in a card that is half the intended size. Conversely, scaling up an 8x12 design to fill a 12x12 mat can cause intricate details to become too small to cut accurately or glue properly.
The Importance of Test Prints
One of the most common mistakes crafters make is printing directly onto their final cardstock. Paper thickness varies significantly between brands. A heavy 110lb cover stock behaves differently than a lighter 65lb text weight. If you do not test the fit first, you might find that the pop-up mechanism is too tight, causing the card to refuse to close, or too loose, resulting in a sagging, lifeless appearance.
To avoid this, always print a test version on standard printer paper. Assemble the test card fully. Check the alignment of the owl’s wings against the background mats. Verify that the central pop-up element rises smoothly without buckling the paper. This step saves time, money, and frustration. It ensures that when you finally use your premium materials, the mechanics work as intended.
Material Selection and Structural Integrity
The longevity of a pop-up card depends entirely on the strength of its folds. A frequent error is using paper that is too thin for the complexity of the design. While delicate papers look beautiful, they may tear at the crease lines after repeated opening and closing. On the other hand, extremely thick cardstock can be difficult to score cleanly, leading to jagged edges and uneven folds.
For the A2 Pop-Up Owl Card, a medium-weight cardstock between 80lb and 100lb cover is often ideal. It provides enough stiffness to hold the pop-up shape but remains flexible enough to fold sharply. Use a bone folder or a burnishing tool to crease every fold line firmly before applying adhesive. Soft folds lead to weak structures that collapse over time. Hard, crisp folds ensure the card maintains its shape year after year.
Adhesive Choices Matter
Another overlooked detail is the type of adhesive used. Liquid glues can warp thin cardstock and take too long to dry, causing misalignment during assembly. Double-sided foam tape is excellent for creating depth, especially for the owl’s eyes or beak, but it adds bulk. If the bulk is excessive, the card may not fit back into its envelope or may force the pop-up mechanism to jam.
Instead of relying solely on foam tape, consider using low-profile adhesive dots or a thin layer of glue stick for flat surfaces. Reserve foam pads only where you need significant lift. This approach keeps the internal mechanism sleek and functional. Remember that the goal is a smooth transition from open to closed. Any excess bulk disrupts this flow and reduces the user experience.
Assembly Precision and Alignment
When assembling the layers, precision is key. The files provided usually include registration marks or guide lines. Align these carefully. If the inner pop-up mat is shifted even a millimeter off-center, the entire design will look crooked. The owl may appear tilted, or its limbs might overlap awkwardly with the background elements.
Take your time during the gluing process. Work in stages. Attach the smallest details first, then move to the larger structural elements. Allow each layer to set slightly before adding the next if possible. Rushing this step often results in bubbles, wrinkles, or visible glue seepage. A neat finish reflects care and professionalism, whether you are making the card for a friend or selling it at a craft fair.
Evaluating the Final Product
Once assembled, hold the card up to the light. Look for any gaps in the joints or uneven edges. Check the movement of the pop-up again. Does it spring up freely? Does it lie flat when closed? If there is resistance, inspect the fold lines. You may need to re-score them more deeply or trim a tiny amount of material from the hinge area to allow for better movement.
The beauty of the A2 Pop-Up Owl Card lies in its simplicity and charm. By avoiding common pitfalls such as incorrect scaling, poor material choice, and rushed assembly, you ensure that your creation is not just a novelty, but a lasting keepsake. Whether you are a seasoned pro looking to add variety to your portfolio or a beginner eager to tackle your first pop-up project, paying attention to these details will elevate your craftsmanship significantly.
Remember, the best cards are those that function as well as they look. Take the time to prepare, test, and refine. The result will be a delightful surprise for anyone who receives it. For further guidance, refer to the detailed tutorial and additional images available on the creator’s blog, which can help clarify specific steps if you encounter uncertainties during your own crafting session.